If you've answered "yes" to any of the questions above, I can help!
Tools used: Ajax, JavaScript, HTML, inline CSS (unless you prefer external style sheets)
If you've never used HTML before, I promise it's super fun and quick to get your form input fields to be aligned and look beautiful, and even require the user input data before form submission.
Before we get started, let me just say that I'm pretty sure that you can be a complete n00b with zero HTML experience and still manage to rip and rob this methodology. Don't let lack of experience draw you away from this simple fix.
Okay, enough intro. Let's get to it.
Setup in Salesforce First
First, I've created a lead record type with two custom fields - Favorite Color and Favorite Color Thing. Then, I made Favorite Color the controlling field to Favorite Color Thing.Important note! Any validation rules that you have setup need to be satisfied by the input you're flowing in via web-to-lead! If they are not satisfied, the lead will not import into your instance of Salesforce correctly.
Favorite Color (controlling field) choices:
- Blue
- Green
- Orange
- Pink
Favorite Color Thing Dependent Choices:
- Blue - Sky, Water, Blueberries
- Green - Grass, Turtles
- Orange- Tiger Lilies, Sunsets, Fall Foliage
- Pink - Sky, Sunsets
I've also set Email to be required on the lead page layout.
Now, I go to Setup > Leads > Web-to-Lead, enable the functionality, click Create Web-to-Lead Form, and add the custom fields to the form.

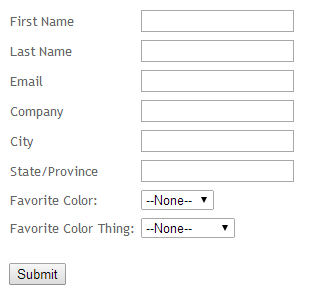
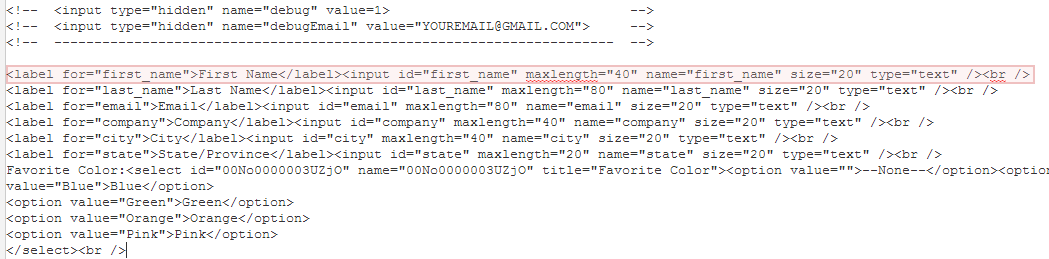
When I clicked Generate, this is what was spit out by Salesforce. The HTML linked renders the pictured form below. Notice the dependencies I've setup in Salesforce did not come over. Additionally, none of the fields look required (or are required) on this form.
Layout Changes
Let's start with the easy fixes first. To create the aligned, pretty table that you see below, we need to add a table element.
For those who don't need explanations, here are quick steps.
- Setup the Web-to-Lead fields in Salesforce.
- Grab the code that Salesforce spits out.
- Encapsulate all of the input fields and field labels in a <table> tag. Read fully commented code here.
- Add a <tr> tag before the first <label> tag to indicate you are creating a row in the table.
- Remove all of the <label> tags. For example, delete <label for "first_name"> and </label>.
- Separate the "guts" of the table into columns with <td> tags. For a visual, read fully commented code here.
- Close the table row with a </tr> tag. For example, your final markup of the first row in the table is <tr><td>First Name</td><td><input id="first_name" maxlength="40" size="20" type="text"/></td></tr>
- Rinse and repeat for all additional fields.
- Close the table tag by adding </table> after the last row.
- Optional: add a line break </br> before the Submit button.
For those who prefer to know more:
If you've ever used Word or Excel, odds are you know what a table looks like. We're using a table to create the view above, only we've set our borders to be hidden. Since we're using elements that are really typical and may be altered by your webmaster's Cascading Style Sheet (CSS) on the webpage you're posting to, you'll want to make sure that any styles are defined in your code unless you want your webmaster to handle font colors and whatnot. For more about CSS and styling HTML, check out w3schools.
Here's what we had before the table tags.
Here's our first row, including the table, tr, and td tags.

A bit more detailed view of our selections in the table. Notice that our custom selects assign the field id for name and element id. Do not change this.

When you view your table, it may or may not include the borders. To exclude the borders, modify your beginning <table> tag to be <table border="0">. Alternatively, you can modify the CSS on the page in the head element, then add a class to the table.
I have uploaded the fully commented basic table code with helpful tips here.
Required Fields
For those who prefer steps...
- Inside the input tag, add required = "true". For example,
<input id="email" maxlength="80" name="email" size="20" type="text" required="true"/> - Make the input field look required by adding a label tag and an asterisk to the end of the field name. For example,
<tr><td>Email<label style="color:red;font-size:15px">*</label></td>
For those who would like to read more...
To make the fields required, we will add additional attributes to the input tags. This required attribute makes the fields required, but they won't look required until we add a required, red asterisk to the code.

All we've done is found an input tag that we need to require, email, and added required="true" inside the tag. Now that it is required, we'll make it look required, too.
Remember, your webmaster may already have classes to use for forms like this, and this step may require that you speak with your webmaster about their site design. We've added the label tag to the first cell in the row because the font tag is not supported in HTML5 and I am trying to stay away from creating external CSS for sake of condensing this blog post. Most webmasters prefer to maintain external CSS, though, since it is a better way to ensure consistency throughout the domain.
Remember, your webmaster may already have classes to use for forms like this, and this step may require that you speak with your webmaster about their site design. We've added the label tag to the first cell in the row because the font tag is not supported in HTML5 and I am trying to stay away from creating external CSS for sake of condensing this blog post. Most webmasters prefer to maintain external CSS, though, since it is a better way to ensure consistency throughout the domain.
To add the red asterisk to the end of the Email field's label, we added <label style="color:red; font-size:15px:>*</label> before the closing cell tag, </td>. The size does not necessarily need to be adjusted, but 15 pixels looked the best for our layout.

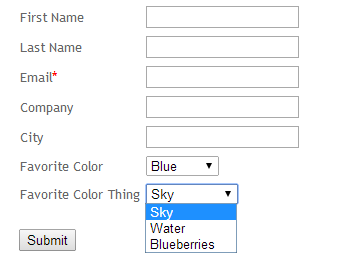
Conditional Picklists
For those who prefer steps:
It's time for the fun part. Let's make our Favorite Color Thing picklist conditional, and dependent on Favorite Color. This step requires adding Ajax and JavaScript to our header element and modifying our selections a tiny bit with a div tag.
- Add ajax and javascript to your head element.
- Create the arrays for your parent picklist and child picklist values.
- Add the "action" functions for the parent field.
- Add the "action" functions for the child field.
- Add a <div> element before the table.
- In the body of the table, modify the picklist for the child field.
- Close the <div> element after the table.
I suggest everyone read the explanation or the fully commented code here.
It's time for the fun part. Let's make our Favorite Color Thing picklist conditional, and dependent on Favorite Color. This step requires adding Ajax and JavaScript to our header element and modifying our selections a tiny bit with a div tag.
First, let's define our relationships again.
Favorite Color - Favorite Color Thing Dependent Choices:
Blue - Sky, Water, Blueberries
Green - Grass, Turtles
Orange- Tiger Lilies, Sunsets, Fall Foliage
Pink - Sky, Sunsets
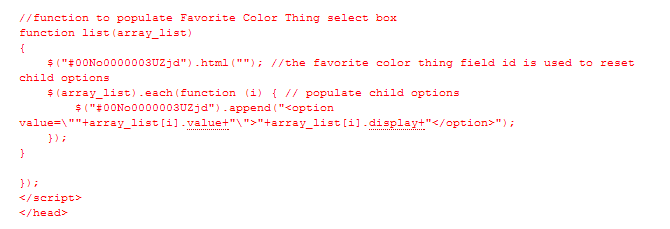
Now, we'll add the script and values to the header of our page. We've assigned each "parent" color selection to a variable, and list each "child" favorite color thing to its parent's array.

Notice we assign a display and a value. If you are creating a parent/child selection for country/state fields, note that Salesforce cares about the value you assign for state/province code picklists. For example, you can display "Florida" as a selection, but you need to assign the value to "FL" if your child is the standard state/province code field.
Next, we'll setup the action for these arrays. You can see we call to the Favorite Color field id then assign the variable favorite_color to it, just to make things easier to read. Our JavaScript will run on the id to insert the array values.We set the default below using the Favorite Color Thing field id. Our default option is blank.
Blue - Sky, Water, Blueberries
Green - Grass, Turtles
Orange- Tiger Lilies, Sunsets, Fall Foliage
Pink - Sky, Sunsets
Now, we'll add the script and values to the header of our page. We've assigned each "parent" color selection to a variable, and list each "child" favorite color thing to its parent's array.
Next, we'll setup the action for these arrays. You can see we call to the Favorite Color field id then assign the variable favorite_color to it, just to make things easier to read. Our JavaScript will run on the id to insert the array values.We set the default below using the Favorite Color Thing field id. Our default option is blank.

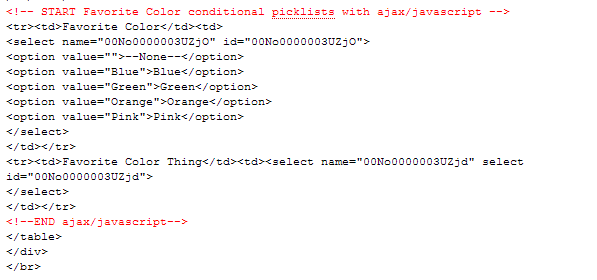
Now, we'll update our table by adding a div tag outside of each of the table tags.

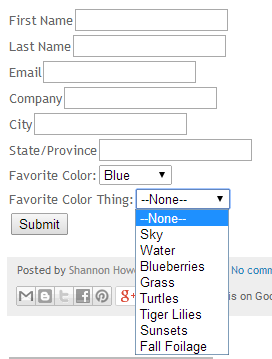
And our last step is adding our updated Favorite Color and our Favorite Color Thing selects. Note, if you are not using dependent picklists, you should have options listed.
Now, we have a form with required fields and dependent picklists. Our final code is available here.
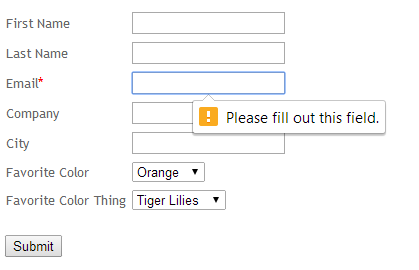
TIP: Before you finalize, test a few times. If you run into errors, uncomment the debug comments. If you have validations on the Lead object, they may negatively impact your creation of new leads. Make sure your required lead fields are included on the Web-to-Lead form - either as hidden inputs or as required fields for the user to complete.